Tips: iPhone Default Keyboard Tops 99% of Others
I assume you've been using iPhone default Keyboard for long, but do you really know it? Otherwise, you might feel unsatisfied and switched to a third-party iPhone keyboard app already. Why don't you give it a chance to learn your way around the default Keyboard on iPhone?
You May Be Interested In:
- Do You Know? 8 iPhone Settings Upgraded in iOS 11
- Apple Maps: Must Know Features When You're Driving
I'm going to show you 5 tips and tricks about iPhone Keyboard that may still remain unknown to you. Be reassured. It's not about the settings of the keyboard or the way how to add new keyboard or switch between keyboards. That's intuitive. So, let's learn some more useful tips here.
CONTENTS
Tip 1: Text Replacement for QuickType
Tip 2: Quickly Move Between Letters
Tip 3: One Handed Keyboard
Tip 4: Dictation - Let Siri Type for You
Tip 5: Insert Special Symbols and Characters
Tip 1: Text Replacement for QuickType
QuickType is Apple's predictive keyboard, which satisfies most users in quickly producing a response. As another way of QuickType, you can set up shortcuts for commonly used words, phrases, and emojis in advance. You hence can quickly type in your pet phases in no time using Text Replacement. Here's how to use Text Replacement.
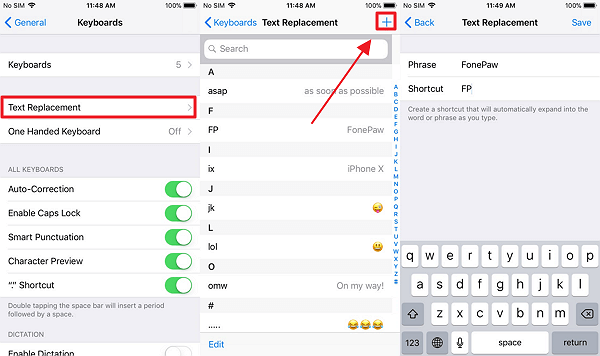
STEP 1. Navigate to "Settings" > "General" > "Keyboard".
STEP 2. Tap "Text Replacement" and check out preset phrases.
STEP 3. To add more text replacements, touch the "+" button on the right top.
STEP 4. Now, finish the blanks behind "Phrase" and "Shortcut".
STEP 5. Tap "Save" and it's done. If you want to delete some, tap "Edit" and "Delete".
Tip 2: Quickly Move Between Letters
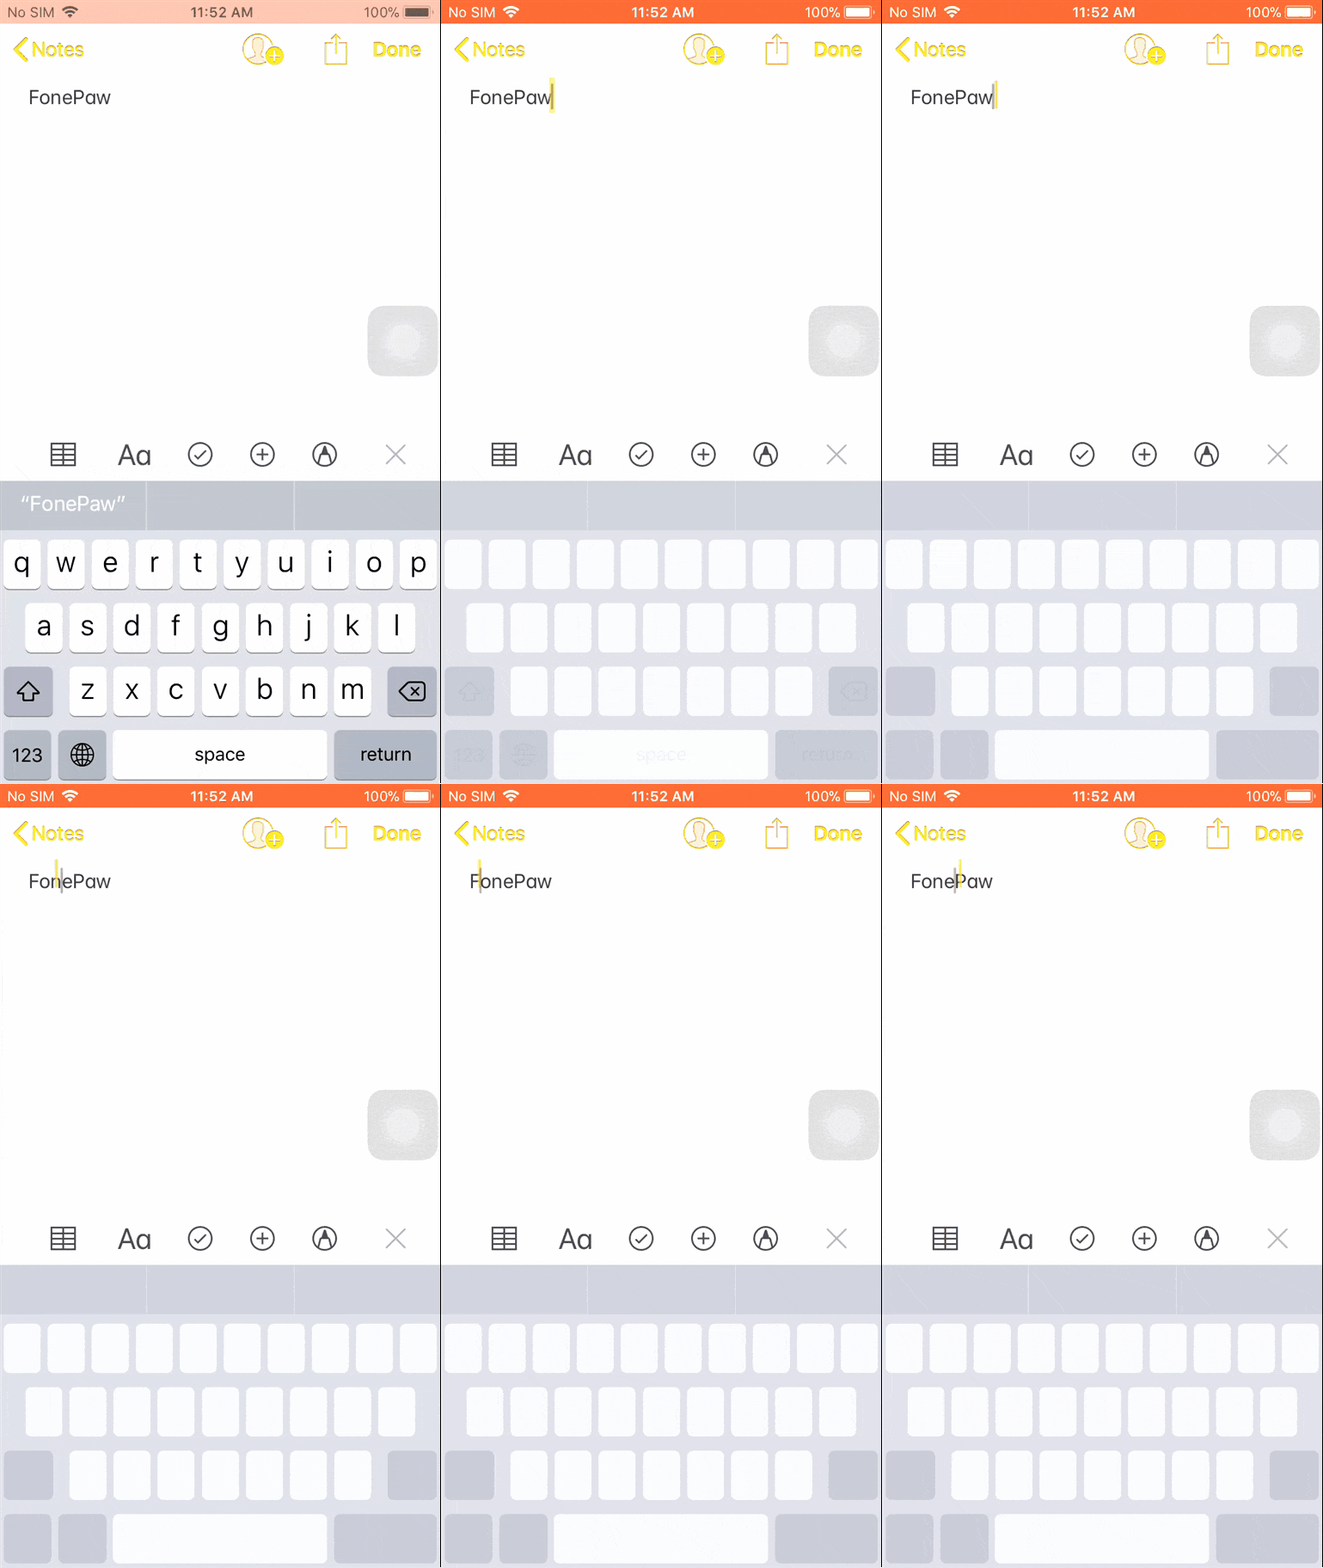
Have you ever been in such a nerve-racking situation like - You made a mistake in spelling when typing a word or a phrase, and then you have to put your finger on the display to move the cursor in the middle of two letters so that you can correct the misspelling. However, somehow it's hard. (or perhaps because of my fat fingers) And this moving stuff starts to drive you nuts.
If you're using iPhone 6S/6S Plus, 7/7 Plus, 8/8 Plus or iPhone X, lucky to you. Now, you have no such a trouble. You can use 3D Touch to easily and quickly navigate to the middle of two letters. Simply hard-press on iPhone Keyboard and you can move the cursor to wherever you wish as the following GIF shows.
Tip 3: One Handed Keyboard
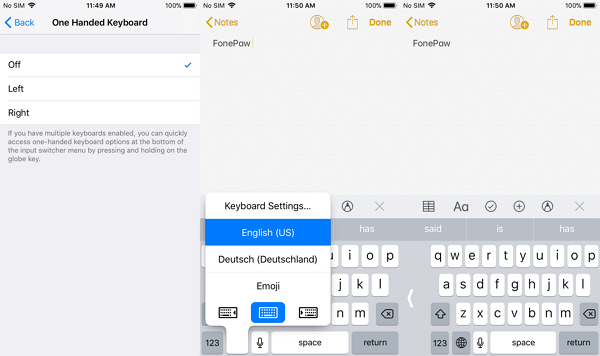
Details make the success. Apple developers are so considerate that they have taken into account the situation when you're too busy to spare two hands and comes out with One Handed Keyboard. Even more thoughtfully, you're able to move the One Handed Keyboard to the left side or the right side according to your habit. There are two ways to enable One Handed Keyboard.
Way 1: Go to "Settings" > "General" > "Keyboard" > "One Handed Keyboard".
Way 2: Hold and press down the "Global" key on iPhone Default Keyboard and select one of icons of keyboards on the menu.
Tip 4: Dictation - Let Siri Type for You
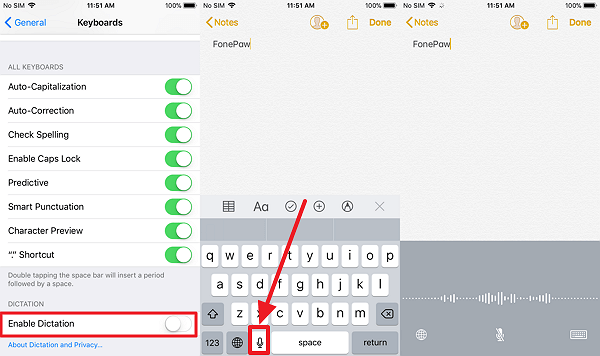
The Dictation feature has been increasingly improved iOS after iOS. If you're not used to it, you may find the microphone icon of the Dictation feature on the Keyboard is a bit in your way, for you would be accidentally and mistakenly tap on this button when unnecessary.
However, the Dictation feature is probably the greatest but most ignored one as part of iPhone Keyboard. Image that you huddle yourself up with a soft quilt in the freezing winter, would it be better if someone types instead of yourself. So, why not let Dictation do your typing? To use Dictation, you can enable it in "Settings" > "General" > "Keyboards" > "Enable Dictation".
Tip 5: Insert Special Symbols and Characters
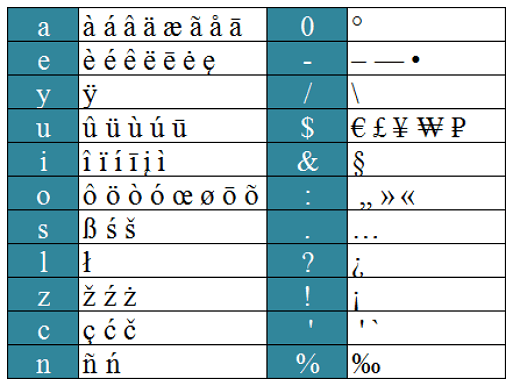
Actually, do you know that you can directly and quickly type in special symbols and character with iPhone Keyboard? iPhone Keyboard provides shortcuts to access and insert limited special symbols and characters with ease. What you need to do is long-press on a letter or a character, and then more options will be available. There are a chart concerning all shortcuts to special symbols and characters for your reference. Why not check it out.
Hope you've learned a lot from this essay. If you like this article, it's always a good thing to share with your loved ones. Your support is the spring of my perseverance. Have a good day!
Advance Notice: The upcoming article is in need if you encountered the "Apple ID Has Been Disabled" issue. Why it happened and how to fix it. Let's find out.


