


How to Use Windows Hello
Competitions between company and company are more and more fierce. Not only Apple Inc. but also Microsoft wants to develop more powerful and surprising features to win its customers. Recently, in Windows 10, there’s an incredible new feature called Windows Hello, which I think it is really cool, handy and secure for us to use on Surface Pro 4, Surface Book, and most PCs which is running Windows 10. You can set up facial-recognition or fingerprint and unlock your Windows computer on Windows 10. Now let’s see how to use Windows Hello.
This biometric security is really awesome. Before we start setting up Windows Hello please make sure that you have a camera or a fingerprint reader on Windows 10.
Four Steps to Set Up Windows Hello on Windows 10
Step 1. Make Sure Your Windows OS is Up-to-date
First of all, go to "Settings" > "Update & security" to check whether you are using the latest version of Windows 10. Then, check whether your camera and fingerprint reader work.
Step 2. Set Up Facial Recognition
1. Go to "Settings" > "Accounts" > "Sign-in options" to find Windows Hello.
2. Then, tap "Get Started" on the pop-up to move on.
3. Set up a PIN code as is required. If you have already set it up, just neglect it.
4. Now, your Windows 10 camera is trying to capture a picture of you. Make sure that your face is clear on the screen.
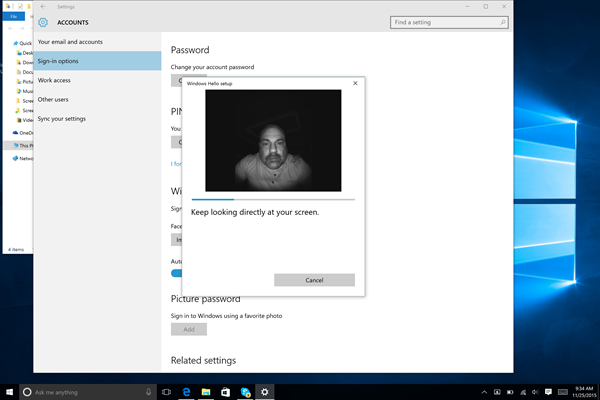
Note: After that, you can click "Finish" to end this or choose "Improve Recognition" to continue scanning. The improve recognition feature helps if you change your appearance frequently. Imagine this - You capture a photo with your beard on your face and when you have your beard shaved you might be blocked from your computer because Windows 10 can't recognize you after you've been shaved. Just choose "Improve Recognition" and you can capture another photo for latter recognition. By the way, the old picture won’t be overwritten.
Step 3. Set Up Fingerprint Reader
If you are afraid that sometimes you change your haircut or something and your PC can't recognize you, you can choose the fingerprint unlock. However, this requires that your device should be Surface Pro 3, Surface Pro 4 and Surface Pro 4 Type Cover with Fingerprint ID.
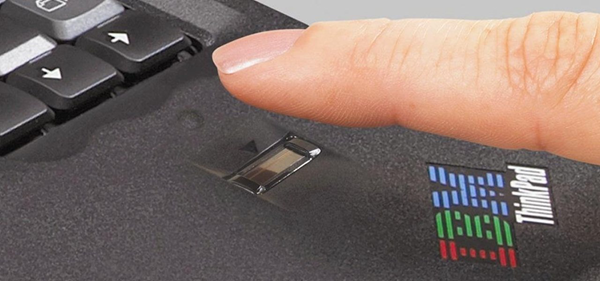
Then you can go straight to the fingerprint reader sensor.
1. Go to "Settings" > "Accounts" > "Sign-in options" and find Windows Hello.
2. Choose Fingerprint and then "Set up"
3. Press your finger on the fingerprint ID sensor on your type cover as instructed on your screen.
Tip: If the skin of your finger always been peel off especially in winter, I will highly recommend you to set up multiple fingerprints to prevent inconveniences it cause. Of course, if you think facial recognition is much convenient, you can skip this step.
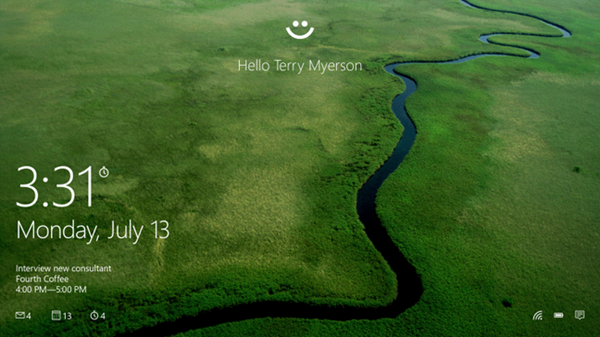
Step 4. Sign in with Windows Hello
Now, as you have set up facial recognition or fingerprint, you can now try to sign in without any password. Tap to wake up your locked Windows and the system will bring up your camera or fingerprint sensor to recognize you. After recognition match, your PC is unlocked.
Windows Hello does a good job to keep our data safe, even if our computer gets stolen-those who keep it can't still peek at data in it. It is really awesome, isn't it? Moreover, one more useful advantage of Windows Hello is that if your kids want to play computer games on your PC before finishing their homework, you can bargain with them that they should finish their homework first. Then? Then you can lock your computer and do whatever you want instead of finding a secret place to hide your PC. But remember, never told them how to set up facial recognition or fingerprint! LOL.
Don't Miss:
How to Upgrade Windows 7 to Windows 10