


Image Capture not Showing Photos or All Photos, What to Do?
Image Capture on Mac is a useful photo management tool for iOS users to transfer photos from iPhone, iPad, any external hard drive or SD card to the Mac. But when you are using Image Capture on Mac, you might also have encountered the embarrassing situation that after you plug in your iPhone to Mac, Image Capture says "no item" with no photos showing, or just showing only some photos.
Restarting both devices or repeating plug-in/out the iPhone sometimes can help to fix Image Capture that is not working, however, it doesn't work all the time. If Image Capture is not showing photos or all photos of your iPhone, read on to learn three workable solutions offered here.
You May Like:
How to Transfer Files from Mac to iPhone
How to Transfer Photos from iPhone to Mac
Solution 1. Disable iCloud Photo Library
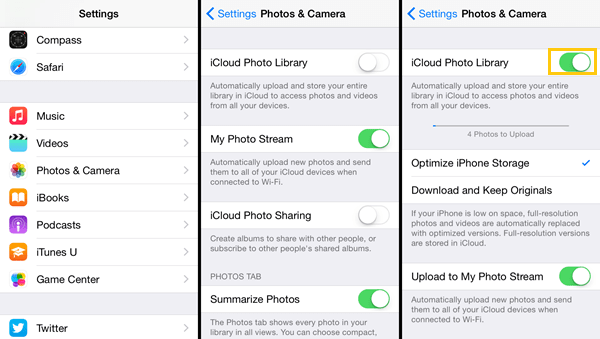
The very first thing you should do is to check the iCloud Photo Library on your iPhone. If it is enabled, together with the feature of "Optimize Storage", some photos will be only stored in the iCloud rather than on your iPhone, thus Image Capture is not showing all photos on your iPhone.
Each time you view the photos, they are downloaded at once from iCloud instead of the phone. So you cannot export those photos directly from the iPhone to Mac with Image Capture.
To solve the problem of Image Capture showing no item on Mac, you need to disable iCloud Photo Library and Optimize Storage on the iPhone. Then the photos will be downloaded back to the phone and loaded on Mac after connection:
- Open Settings on iPhone.
- Scroll down and tap on "Photos & Camera".
(For iOS 12: tap on "Photos"). - Toggle off iCloud Photo Library. The Optimize iPhone Storage will be disabled simultaneously.
After the settings, wait for the photos downloaded back to your phone. Then connect the iPhone to Mac again, and check whether all the photos show up in Image Capture.
Solution 2. Update Mac System
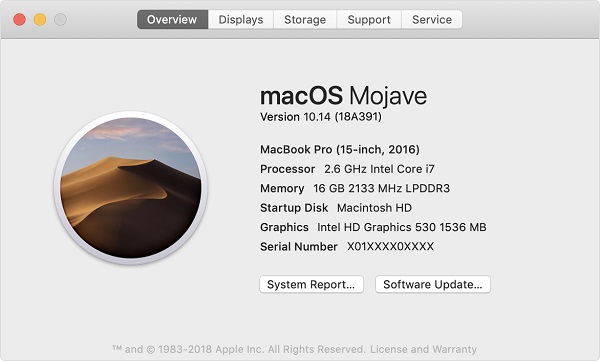
In case that you do not even enable iCloud Photo Library, or you've disabled it, but Image Capture on Mac is still not showing up your iPhone photos or can't recognize your iPhone, you may update the Mac system.
Some older Mac system versions are not compatible with the new iOS system. For example, if your iPhone is running iOS 12, the photos taken by it are saved as HEIF format, while this format cannot be transferred nor opened normally on the Mac running macOS 10.12.
So if you've updated your iPhone/iPad to iOS 11 or above, you need to check your macOS system and update it to the latest version or at least the one compatible with the iOS device.
Solution 3. Use FonePaw iOS Transfer
If Image Capture cannot recognize your iPhone or is not showing photos on your iPhone, we'd like to recommend FonePaw iOS Transfer to you. This is a powerful iOS data transfer software that can help you transfer photos, videos, music, contacts and even SMS from iOS devices to PC/Mac in simple clicks.
With FonePaw iOS Transfer, you can export the photos on your iPhone to Mac easily, and you won't have the problem as in Image Capture. Follow the simple steps below to transfer photos from iPhone to Mac.
Windows Version DownloadMac Version Download
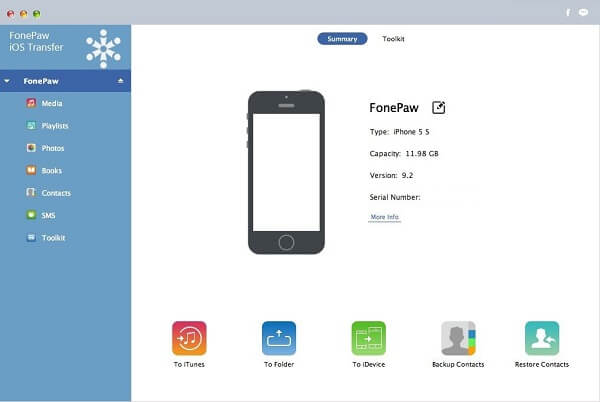
Step 1: Get the transfer program and the phone ready
Download, install and launch FonePaw iOS Transfer on your Mac. Connect your iPhone to Mac through a USB cable. The basic information of your iPhone will show up in the program after a successful connection.
Step 2: Choose the photos to be transferred
Click on "Photos" on the left side-bar. Open one of the albums and tick the photos you want to transfer. There is the Preview feature provided: right-click on the photo(s) and select "Preview".
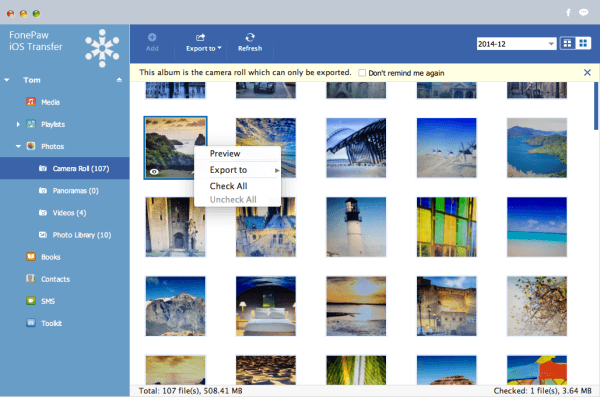
Step 3: Export the photos to your Mac
After selecting the wanted photos, click on "Export to" button at the top toolbar. Or right-click on the photos and choose "Export to" in the pull-down menu. Simply click "Export to Mac", and then choose a folder to save the photos.

When the transferring finishes, you are able to open the chosen folder and view the photos.
In addition to transferring photos, there are more features you can enjoy with FonePaw iOS Transfer: editing contacts on iPhone, making your own ringtone, importing files from Mac to mobile devices.
Have you got some ideas to solve the empty Image Capture on Mac from this guide? If you've tried the solutions above and want to share some experience, or if you have better ideas, welcome to leave comments to let us know. Share the guide to help more people!